Developing games and puzzles with 3D printing for STEAM

Teaching ressources for STEAM lessons: Printable games for a variety of applications in the classroom - aiming at providing fun and knowledge. 3D printing in STEAM education can be valuable especially for creating custom teaching material. Moreover, it can be used to create tangible visualisations of virtual concepts as are used in mathematics. As a motivational and learning bonus, it utilizes concepts of constructivism.
Table of Contents
- About the Project
- Aim of the Project
- developing competences - steps
- Template Lesson/Workshop plan
- A Puzzle Overview
- About 3D printing
- About 3D Printing
- Creating a 3D printable model
- From GeoGebra to Printable Puzzle
- Examples of 3D printing in the classroom
- Printable Puzzles
- Cube Puzzles
- Can I make my own puzzle?
- Cubo para Marcela UFTM
- cube divided by 2 (workshop Český Krumlov)
- Dividing a cube by 2
- Dividing a cube by 3
- Dividing a cube by 4
- Lesson/Workshop suggestion - CUBES
- Cube Puzzle - Lesson Plan
- Voronoi Puzzles
- Voronoi Cones
- Voronoi-Diagramme
- Voronoi - Lesson Plan
- Equiangular Spiral,Voronoi and Delaunay Patterns
- Fractal Puzzles
- Fractal curves - points and edges - lesson plan
- Fractal Curves
- dragon curve
- Harter-Heighway Dragon fractal
- Triangle Puzzles
- Create one Logifaces part
- Puzzle Square - Equilateral triangle
- lessonplan template
- Cookie Cutter Puzzles
- Cookie Cutters - extra fun!
- Maze Puzzles
- Reflection Maze
- Brachistochrone
Aim of the Project
A toolkit for workshops, presentations, fun in the classroom aiming at collaboration and problem solving
The project's aim is to develop both guidelines to develop games as well as create game ideas with guidelines how to use them.[br][br]The guidelines and ideas will include concepts for the processes based on our previous work and on new ideas. Several steps could lead to the production of a mathematical puzzles which consist of:[list=1][*]Developing an idea for a puzzle[br] [/*][*]Designing 3-dimensional models for 3D printing[br] [/*][*]Producing the model[br] [/*][*]Observe and try out the outcome testing whether the result is satisfactory or the process has to be repeated[br][/*][/list][br]The goals for a successfully developed puzzle are:[br][br][list=1][*]Increase geometric vocabulary[br] [/*][*]Actively use and understand guidelines by the JKU team[br] [/*][*]Use Soft skills to effectively collaborate[br] [/*][*]Improve creative problem solving [br] [/*][*]Improve the visibility of the JKU by taking home self-made items[br] [/*][*]Attract especially young people by using emerging technologies[br] [/*][*]Improve ability to connect abstract concepts and concrete items[br][br][/*][/list][br]
About 3D Printing
What does 3D printing mean?
3D printing is a technology for additive manufaturing. In contrast to eg. CNC milling, there is no material taken away to produce a part but material is added until a part is built.[br]It can be compared a bit to the difference between a sculpture where a person is carved out of a rock like Michelangelos David in contrast to a snowman where snow is collected in balls until a hat and a nose can be attached.[br]Material is usually added in layers, like a cake often consists of layers that are connected by some cream. For 3D printing, the layers can be connected in different ways, regarding on the technology.[br]
How old is 3D printing?
For many people, 3D printing is a very new technology which they only discovered recently. However, the for some surprising truth is that 3D printing is a rather old technology. One technologiy - Stereolithography - was developed in 1981 and patented in 1984. The first program for developing 3D models was available since 1983 meaning it is even older than the World Wide Web which was developed in 1989.[br]In fact, 3D printing is already used for prototyping quite often in the industry. It was just not widely used by end users as of yet.[br][br]
Why is 3D printing getting more popular?
In the year 2009, the patent for the Fused Deposition Modeling technology expired. As a result, enthusiasts especially from the field of mathematics started to develop cheap versions of machines using this technology. The now cheaper machines lead to a dropping of prices from 20.000€ and above to only a few hundred within only a decade for really affordable machines.[br]Other patents expired in the last years allowing more affordable machines as well.[br]Not only did prices get more affordable, also the technologies themselves developed and gained better quality by the advent of using 3D printing for the quick production of items or prototypes. And as 3D printing is now more in the focus, more interesting fields like sophisticated materials or new fields of usage open up.
Technology Overview
Technologies can be cathegorized by their used materials and the way they add each layer of material to existing hardened material. Materials cover powders, liquids, endless filaments, granulates, and more. What they all currently share: a layer of material each is hardened and fused with another layer of material until an entire item can be taken out of the machine.[br][br]
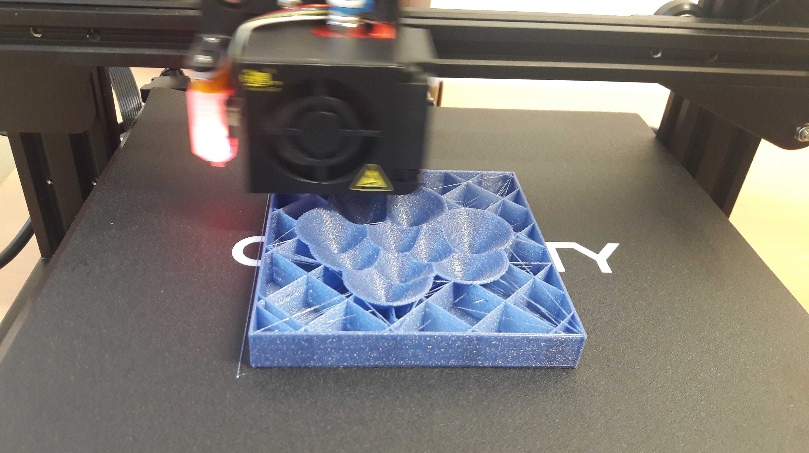
FDM/FFF - adding layers until an item is produced
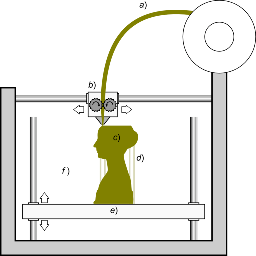
In FFF, a filament which is an endless material string [b]a)[/b] of a thermoplast material is transported to a head that heats up the material [b]b)[/b] and then melts and extrudes it through a nozzle layer per layer [b]c)[/b]. Often, the platform also moves [b]e)[/b]. This technology needs support structures [b]d)[/b] at certain angles to avoid falling layers. Image by Scopigno R., Cignoni P., Pietroni N., Callieri M., Dellepiane M. (2017). "[url=http://vcg.isti.cnr.it/Publications/2017/SCPCD17/DigitalFabricationForCH.pdf]Digital Fabrication Techniques for Cultural Heritage: A Survey[/url]". Computer Graphics Forum 36 (1): 6–21. [url=https://en.wikipedia.org/wiki/Digital_object_identifier]DOI[/url]:[url=https://doi.org/10.1111/cgf.12781]10.1111/cgf.12781[/url].
FDM/FFF - Fused Deposition Modeling/Fused Filament Fabrication
The 3D printing technology which is very affordable and widely available is FDM or FFF which works basically like a glue pistol adding material layer per layer through a nozzle. The technology was developed by S. Scott and Lisa Crump who were part of the company Stratasys. The company Stratasys still holds the patent of the name FDM, thus the RepRap movement - a group of enthusiasts with mostly a mathematical background - created the name FFF which can be used without constraints.[br]This technology uses so called thermoplasts as material. A thermoplast is a material which melts when heated up, is then squeezed through a nozzle and afterwards hardens when cooling down. Often, those [br]thermoplasts are sold as filaments, long strings without any end in one color. [br]As explained before, each melted layer hardens in order to allow another layer to be extruded on top of the old layer. The precision of this technology relies heavily on the layer thickness and the nozzle diameter. The smaller both is, the slower but more accurate the production process is. FDM needs support material for overhangs usually bewtween 30 to 40 degrees.[br]Colors of FDM printed items have the color of the filament used. Most printers use one filament and thus produce items in one color.
SLA - Stereolithography
Developed in 1981 and patented in 1986 by Robert C. Hull, the oldest 3D printing technology uses a material that hardens when exposed to UV light by eg. a laser and is usually a photopolymer - resin is often used today as a material. This technology allows a very high precision. However, it needs to be postprocessed since the sun emits UV light leading to an ongoing hardening process turning it brittle over time. [br]Hull also developed the STL file format. The items produced have the color of the used photopolymer which is usually one color but since it has to have a coating due to the UV hardening, it can be colored afterwards. A variation is spraying photopolymer as droplets through a nozzle hardening the material directly afterwards using a UV lamp. This technology needs support since it is either produced within a liquid or [br]into air.
SLS/SLM - Laser Sintering/Laser Melting
This technology uses a powder, often a variation of Nylon and thus a bit flexible but still very robust, which is applied in layers in some kind of building space, heated up until right before melting together and [br]then shot at by lasers to heat up the material all the way up until they sinter or melt together. Afterwards, the material has to cool down and then can be dug out of the remaining material like a geologist would dig[br] out items from dust. Material only comes in Black, White and variations inbetween so usually, white material is print and the objects are then dyed to achieve colors. Support is not needed since below each layer of material is an existing powder layer of material.
Binderjetting/Inkjet 3D Printing
Just as SLS, Binderjetting uses powder as material, usually gypsum or ceramics but also metal is possible. The material is added in layers, afterwards glued together and then the item is dug out of the remaining [br]powder just as the SLS process - only without a cooldown phase. Furthermore, support is not needed and the majority of unused powder can just be reused.[br]Since the glue can be colored, this technology can produce colorful items.
Examples of 3D printing in the classroom
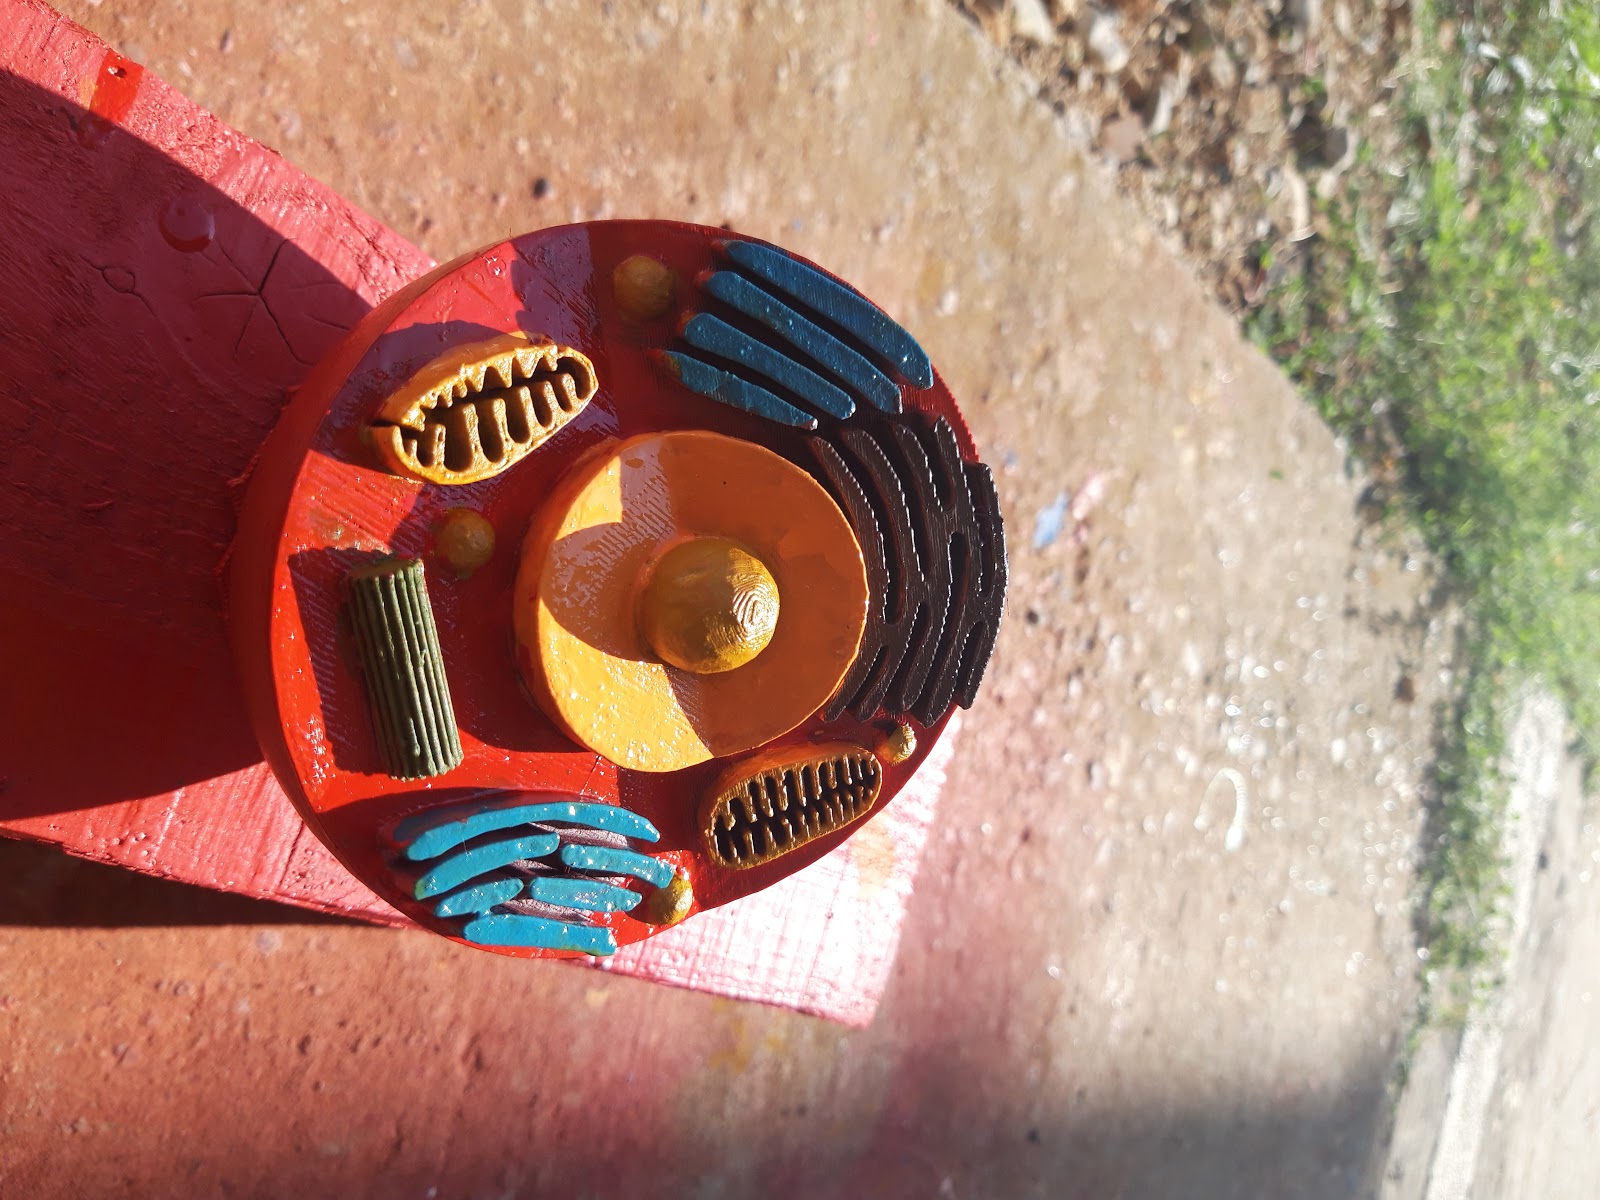
A cell
Printed and colored by students
[img width=325px;,height=244px;]https://lh3.googleusercontent.com/cmw2oeGrRVGVrmJp2N0Xl6dqoYrko2D7qBhZ2diDEAxnGSssytKYvI1-57VQcFPXqnw2JFxB3XuNQid_B5QXNfYKAiLHm1JZ3_hWC2JF6TAXOb-I0KyG2RN5TES-xY4fXu1SaihJhvI[/img]
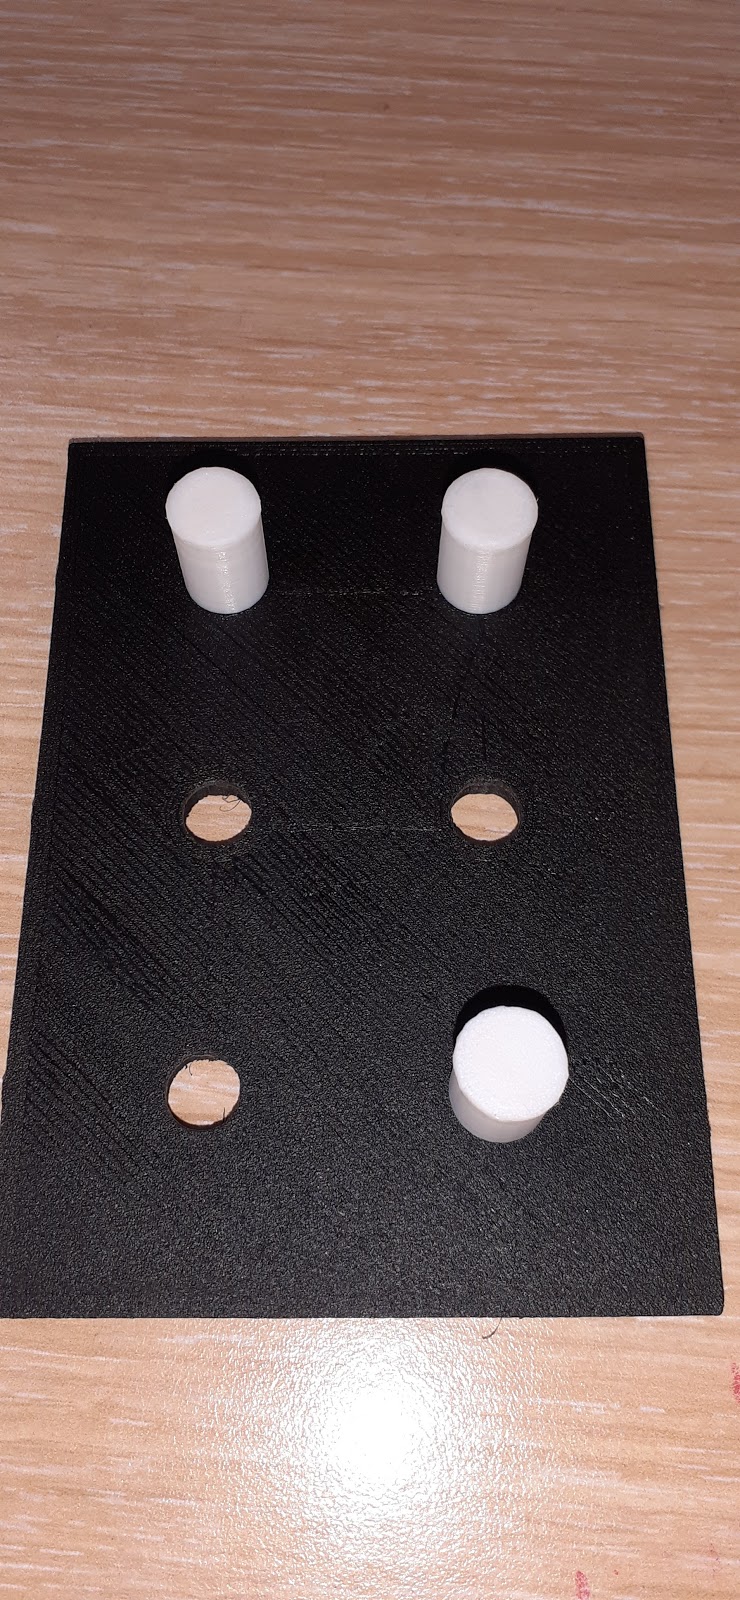
A tool to learn Braille
Developed by a school in Montenegro
[img width=109px;,height=236px;]https://lh4.googleusercontent.com/0q0fMSQNkkRkTP4WT3ewJdZkhyOO5hFuMoFreeKrK_lXrO44OaG_YqdesNMAw5zQq6uepAvzJUYJoT5GOaN82cOjF8fHAqB3DXN2CiqvH5-FflE-pP8g_gfOddME88C7jYjvT5axMAY[/img][img width=252px;,height=117px;]https://lh4.googleusercontent.com/FF68S2pzLb-K1zODQPw40CFjWJyKlQzgHqCL5EPA6hU1r4nPWXtVQN-bK2dAB60buafDTx1_g899VRxVLy5dWfsdTuC_lsSaaZBLuS3a9aO6PMTnPBZumuZNAqq0wWKeDxJGbbkzXMw[/img]
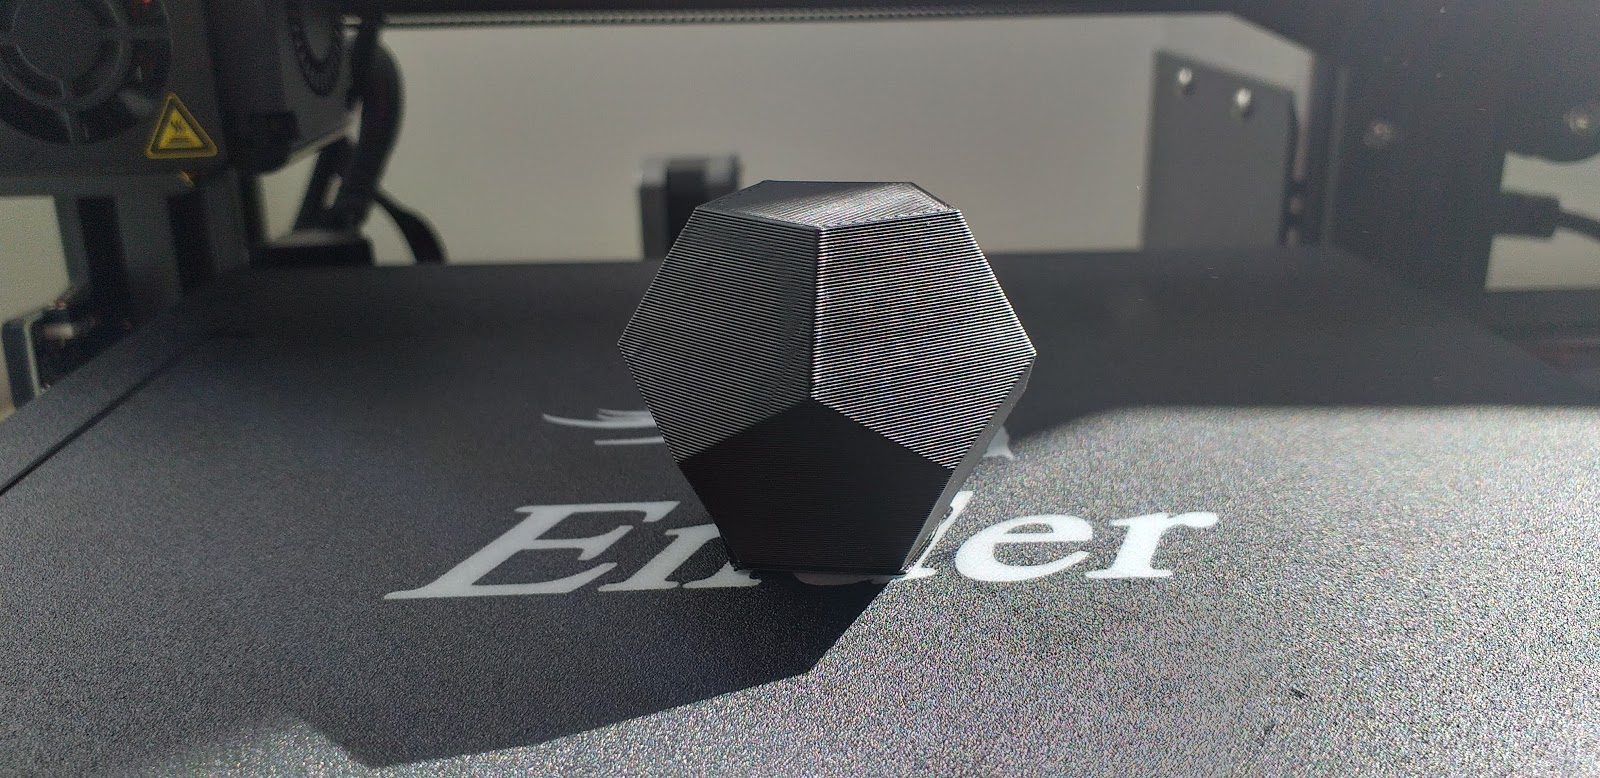
Geometrical Objects
Touch the mathematics!
[img width=289px;,height=140px;]https://lh5.googleusercontent.com/WV2pGq243jTKxa5XqE6jLdXXa_i4zbyglc7aEuQWRrqbIXeAe3asBi4Uiko0c_XzrpiXPNm-tnpWkMONUwthCwWESm8zGMHS-My9ZCLWh8qbtJSZVFwPfExK2eNrhwhj-B5Xc-6syE8[/img]
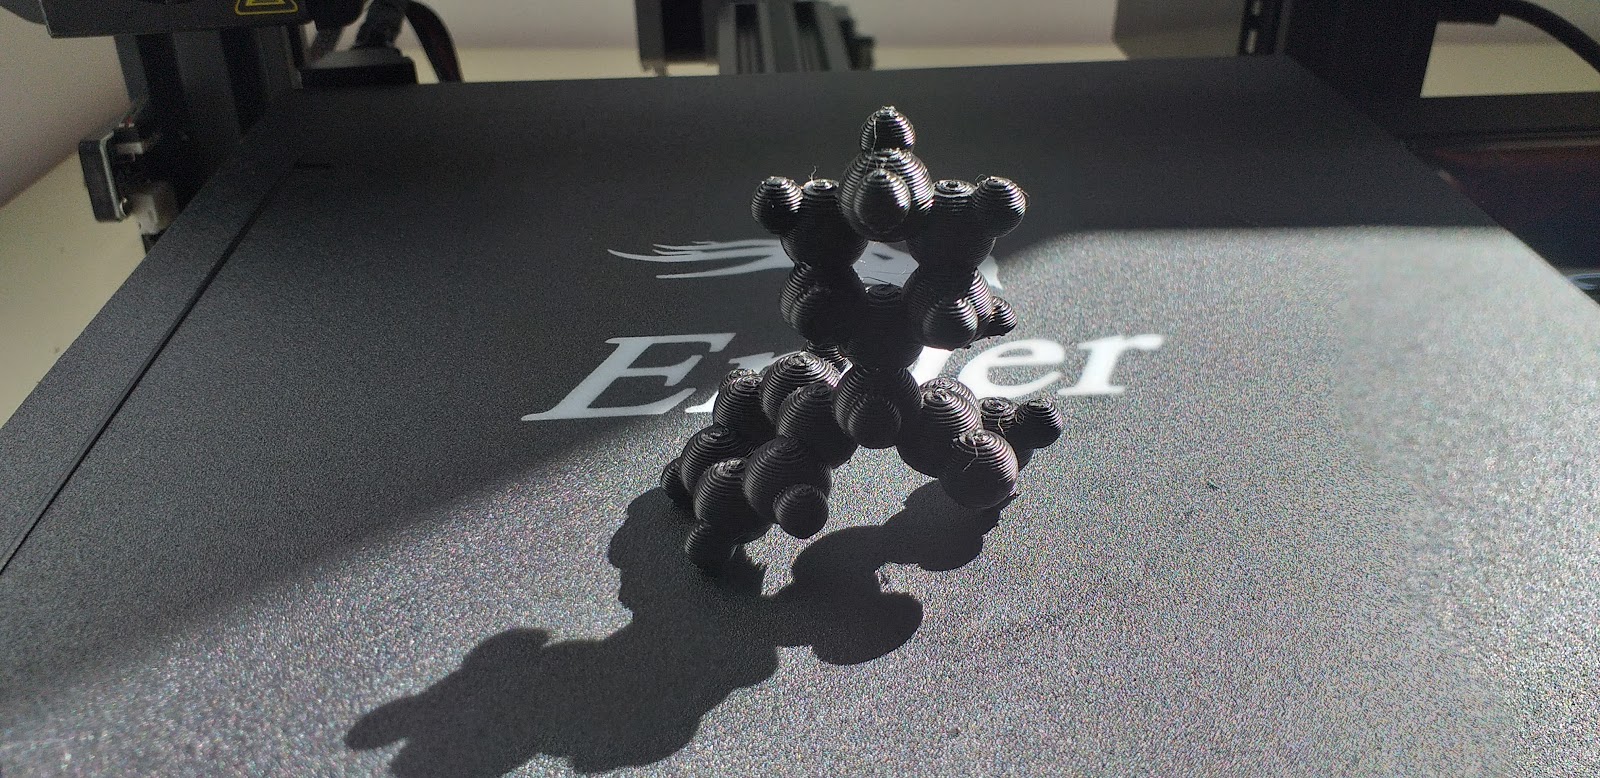
Molecules
Understand chemistry better.
[img width=325px;,height=158px;]https://lh4.googleusercontent.com/BDLyp0LnjWDz11v4Md7OX1ooOl83lidtwKCh5IsGr0-2UoUzsNHGWKNrVO-tFF8Wp0CgeDh8BMqecB0ZGvcpolmRz2iuN_STKaxPwQl9UwnX6nVdfHPzK_RQetYFndkjrdjscSZViws[/img]
Can I make my own puzzle?
To create your own puzzle, the first thing you need is an idea.
Investigate which parts a cube consists of.[br]Find out which geometries you can see in combination.[br]Turn a cube upside down, inside out.[br][br]Making drawings can help alot to find your special and personal way how to create a cube puzzle - or any puzzle for that matter.[br][br]We will aim for a super simple puzzle - a cube made out of two rectangles.
Make a prototype
It can help also to make a prototype of your puzzle out of paper.[br]This is especially helpful if you want to get a feeling for alle the geometrical shapes your puzzle could consist of. Maybe you find an even better solution in the process!
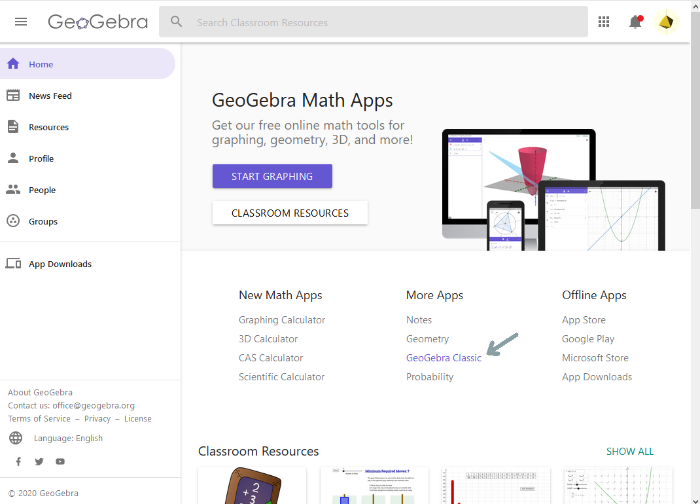
Open GeoGebra, start working!
After you kow exactly how your puzzle should look like, create an applet using GeoGebra to realise it.[br]First, go to your resources and create a new one. You find this possibility if you go to the Geogebra website and choose [b]GeoGebra classic.[/b]
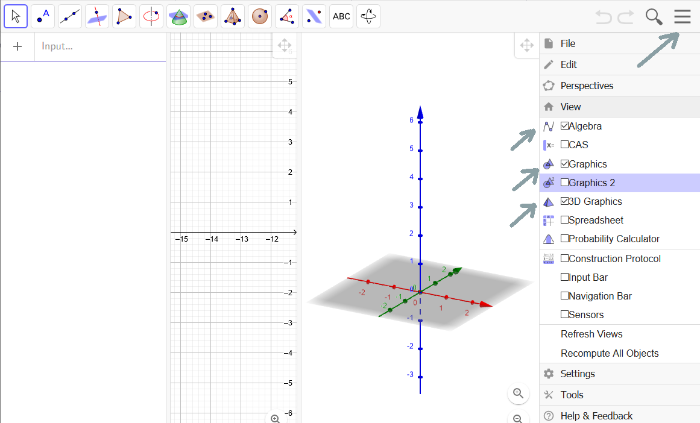
Adjust your working space
After opening the classic GeoGebra version, you might want to make sure you adjust it to your personal needs.[br]Usually, three things help:[br][list][*]The Algebra view[/*][*]The Graphics view[/*][*]The 3D Graphics view[/*][/list][br]You can find them when selecting [b]the three lines menu on the upper right[/b] corner and then choose view.
Create shapes
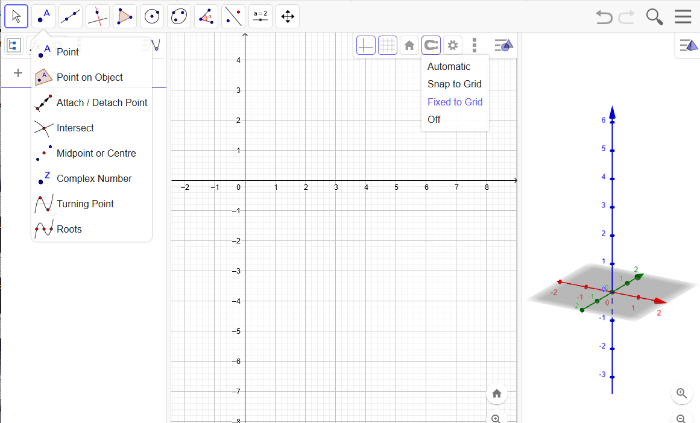
GeoGebra is able to make polygones into 3 dimensional objects.[br]Our example consists of simple shapes. If you have more experience with GeoGebra, you will be able to create much more complex shapes.[br][br]To make it easier for us, we first set the points to be fixed to the grid and then select the points tool.
Make geometrical shapes
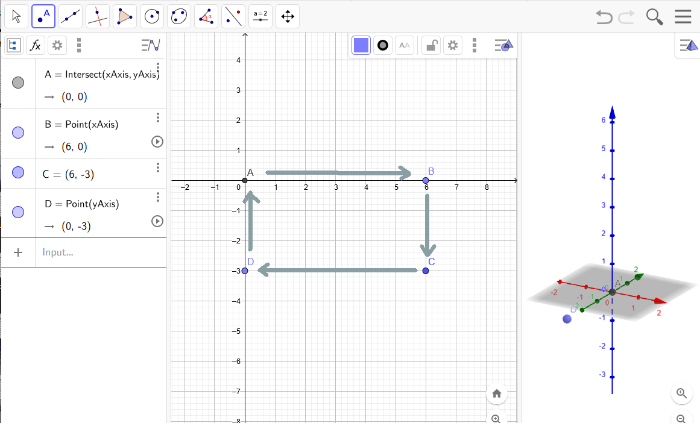
Next, create your geometrical shapes. Add dots in a shape and end where you started to close the shape.[br]If you chose the option of having the points on the grid, on the left side you see that we avoided commas by that, the coordinates of the points will be wholenumbered.
Polygone creation!
Now, you can select the polygone tool - the thing shaped like a triangle - on the upper left menu.[br]Click on all the previously created dots. Again, in a row, and end where you started.
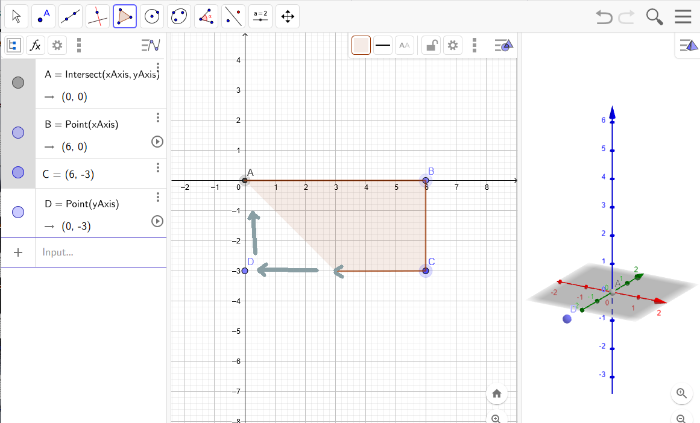
This will give you a bunch of new stuff in the algebraic view on the left.[br]Also, a polygone will appear in your 3D view.
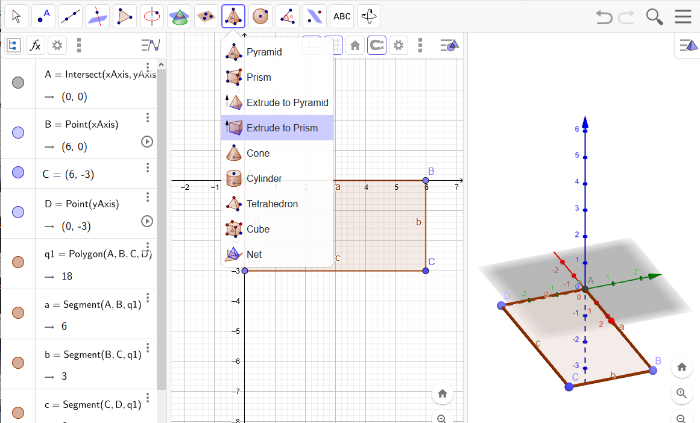
Extrude!
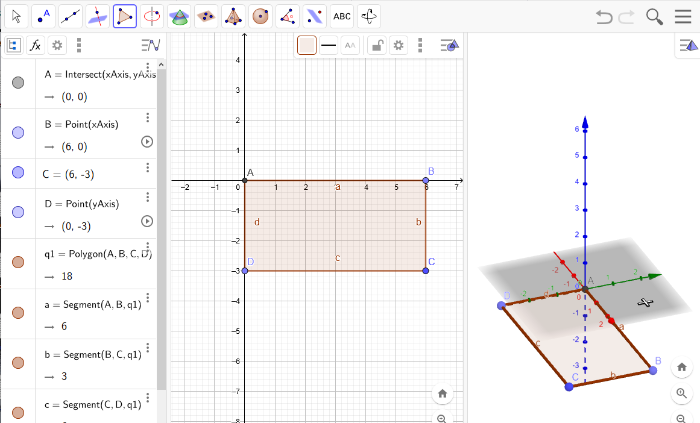
Now, make your polygone a 3D object by a so called extrusion.[br]To do that, go to the pyramid symbol a little further left and choose [b]Extrude to Prism.[br][/b]No worries, you will get the shape you created, not a prism ;)
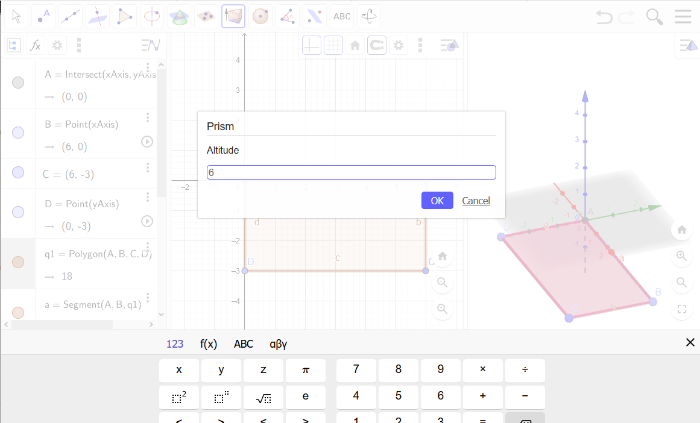
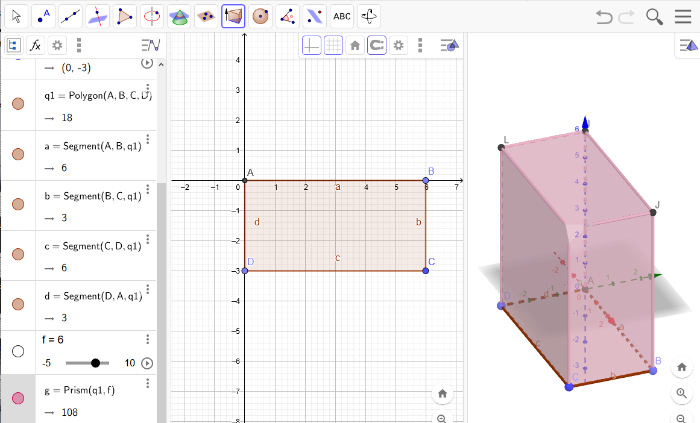
Click onto your prism in the 3D Geometry view. A popup will ask you how high it should get extrudet!
Voronoi Cones

A Voronoi diagram is a partitioning of a plane into regions such that each region contains one generating point and every point in a given region is closer to its generating point than to any other. GeoGebra has a built-in Voronoi function, where you input a list of points and GeoGebra will generate the Voronoi boundaries. After reading recently about how Voronoi diagrams can be generated through the use of cones, I decided to make this worksheet to demonstrate the idea. Each point represents the vertex of a cone. Move the points around and watch the pattern morph. The cones, when viewed directly from above, show the Voronoi pattern. Use the checkbox to show the Voronoi boundaries generated by the GeoGebra Voronoi function. Slide the slider to see the cones collapse or grow.
GAMING IDEAS
[b]1. Puzzle solving[br][/b][i]material: Voronoi-Cone-Parts[br][/i][br]Try to build the cone puzzle so that the cones fit exactly together. [br]After finishing you can control, if the puzzle fits into the frame.[br][br][br][br][b]2. Polygone throwing[/b][br][i]material: Voronoi-Cone-Landscape, Polygons[/i][br][br]Each player creates any polygon in GeoGebra and prints it 3 times. The aim is now to throw the polygons onto a cone tip from a distance defined together.[br][br][br][b]3. Ring throwing[/b][br][i]material: Voronoi-Cone-Landscape with differently coloured cones[/i][br][br]Each player chooses a color and tries to throw his/her rings exclusively on cones of that color.[br] [br][br][b]4. Shortest way[/b][br][i]material: Voronoi-Cone-Landscape, rope, sticky tape/dots[/i][br][br]Imagine each one of you living in a hut on one of the cone tips. Mark your huts with the sticky dots. Now you want to meet on another tip. At which tip will your meeting take place? (shortest way)[br]Check your result by measuring the path with the rope.[br][br][i]Variation:[/i][br]In the valley there is a coffee house at every junction. In which one will you meet? (After descending from your mountain, you'll only hike through the valleys.)[br][br][br][b]5. Idea[/b][br][i]material: Voronoi-Cone-Landscape with marked A and X, “solution rope” [/i][br] [br]Imagine you are a climber and you would like to climb up the mountain X. You start point is A. Thanks to your good equipment you can choose any route. [br]Which would be the least strenuous (least altitude)?[br]Check with the rope whether it is sufficient for your route. If not, there should be an even easier way. [br][br][br]
Fractal curves - points and edges - lesson plan
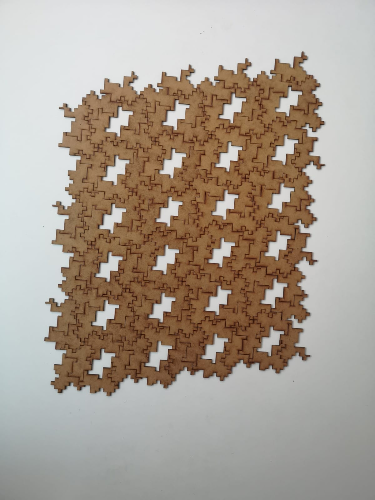
One possible solution
Fractal game workshop plan
[b]Materials:[/b] [br]puzzle-parts (each pupil gets a package à 55 pieces)[br]possibly a beamer for presenting the photos of the puzzles[br][br][b]Learning outcomes:[/b] [br]Recognising repetitions and symmetries, sharpening perception of the environment, recognising that sequences and series are also a way of repetition, learning mathematical descriptions of repetitions through fractals, patterns, enlargements and reductions, ...[br][br][b]Curricula:[/b][br][list][*]primary school (VS, 6-10 years): symmetries, perception, surfaces, shapes, ...[/*][*]lower secondary school (Sek I, 10-14 years): (Self-)similarity, uniform scaling[/*][*]upper secondary school (Sek II, 14-18 years): fractals, sequences and series[br][/*][/list][b]Duration:[/b] [br]2 school lessons à 50 minutes (on different days)[br][br][b]Teaching Methods:[/b][br][list][*]teacher-centered instruction (frontal) [/*][*]individual work[/*][*]plenary[/*][*]group work[/*][/list]
Introduction
[list][*]teaching method: frontal[/*][*]duration: 10 min + 5 min time buffer[/*][*]materials: photos, pictures, videos, vegetables, pine cones, ... [/*][/list][br]The teacher explains that in nature sometimes things repeat themselves and that this can basically be described mathematically. [br][br]Pictures/videos/... are being viewed. [br][br][b]further ideas for an extended instruction:[/b][br][i]primary school:[/i][br][list][*]consider if you include the video!?[br][/*][*]students should bring objects such as pine cones, ... [br][/*][*]pass objects through, let them discover regularities and repetitions[/*][/list][br][i]lower secondary school[br][/i][list][*]show video, show pictures of objects that contain repetitions[/*][*]show scaling using GeoGebra[/*][/list] - square & rectangle, composed/decomposed surface[br] - cutting surfaces into smaller self-similar parts[br][br][i]upper secondary school[br][/i][list][*]show video, show pictures of objects that contain repetition[/*][*]explaining mathematical concepts of sequences and series[/*][*]explaining the meaning of endless repetition, Mandelbrot set, ...[/*][/list]
Puzzling alone - find your personal solution
[list][*]teaching method: individual work[/*][*]duration: 20 min + 10 min[/*][*]material: puzzle[/*][/list][br]Handing out the puzzle. Explaining the task: "Use this puzzle to make a repetition or pattern that you consider beautifully". (Help may only be given "technically" and not "contentwise".)[br][br]After half the time, announce the time. After 20 minutes, give another 10 minutes extra time. If there are specially fast students, the teacher goes there, takes a photo and asks students to find a new solution.
Reflection - what did you like about your solution?
[list][*]teaching methods: plenary discussion[/*][*]duration: 15 Minuten[/*][*]material: finished puzzle-results, beamer (for presenting photos of further puzzle-results)[/*][/list][br]The students present their results to the rest of the class and explain how they solved the puzzle and what they like about their results (and why).
Connecting puzzles
[list][*]teaching method: group work[/*][*]duration: 30 min[/*][*]material: puzzle[/*][/list][br]Students meet in teams or are divided into teams by the teacher. In this unit the students either try to combine their two results or to work out a new solution for the task together. [br]
Follow up after the workshop
[i]primary school[br][/i]"Geometric forms arise from different (other) geometric forms", no longer just "the round must go into the round".[br][br][i]lower secondary school[/i][br]students should work with applets of e.g. Diego Lieban: cutting up triangles, ... so that the result is self-similar.[br][br][i]upper secondary school[/i][br]continue with the topics "sequences and series"
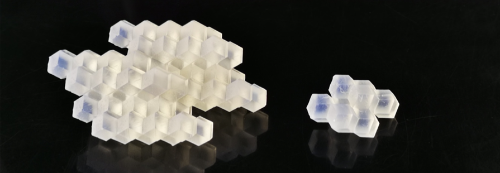
Create one Logifaces part
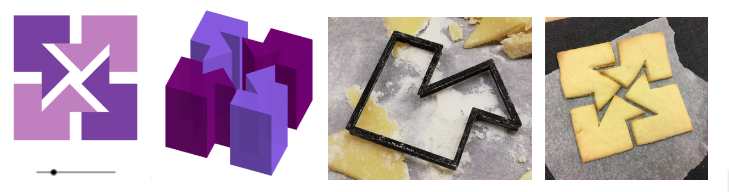
Cookie Cutters - extra fun!
Make something yourself
Personalised manipulatives have the potential to improve learning experiences and can be quickly realised using 3D printing technology. Kolb & Bauback suggest that 3D printing allows students to increase their geometrical and technical knowledge by building objects. In addition to being able to apply a variety of STEAM topics when creating 3D prints students can create something that fulfils their wishes, inspirations and needs. Moreover, building objects is one of the most important characteristics of constructivist learning.
3D printing allows the creation of a variety of items, including those that represent mathematical concepts. Vanscoder mentions the high value of such representations and that prototyping contributes to students’ acquiring and training their engineering and art skills.
Step by step approach
First let your students explore the application to explore a cube disection.[br]Then take the picture of the disected cube and let your students create a cookie cutter in the same shape.[br]Bake cookies without wasting dough!
Cubes by Diego
Create the cookie cutter
[list][*]You can either create the cookie cutter using GeoGebra[/*][*]Or you can use external programs to create one: https://www.geogebra.org/m/vuqmhuar[/*][/list]
Reflection Maze
|
Work the [color=#c51414]red point through the maze[/color] by [color=#1551b5]dragging the blue point[/color]. |
|
|