Wiring up USBasp
You need to wire up the end of the ribbon cable from the USBasp to the ATtiny85. Make sure you get it the right way round.
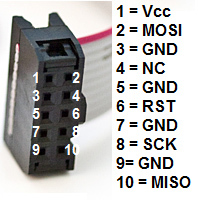
As well as the notch, check the red wire of the ribbon cable - on mine it matches to VCC/MOSI end of the plug at both ends of the cable. Also check if the diagram you use is "from above" or "looking into" the plug
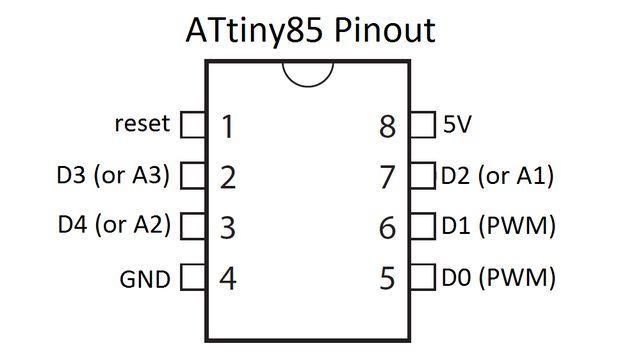
You can tell which way round the ATtiny85 goes by looking for a small circle which indicates "pin 1"
You need to make the following 6 connections using some breadboard and wires.
MOSI: USBasp pin 1 to ATtiny85 pin 5
RST: USBasp pin 5 to ATtiny85 pin 1
SCK: USBasp pin 7 to ATtiny85 pin 7
MISO: USBasp pin 9 to ATtiny85 pin 6
VCC: USBasp pin 2 to ATtiny85 pin 8
GND: USBasp pin 10 to ATtiny85 pin 4
Once you've got that working you may want to wire up a more robust solution using a socket soldered to some protoboard, search for "2.54mm 2x5 Pin Straight Male Shrouded header IDC Socket" on eBay.
Once you've wired it up, then Khazama AVR Progrogrammer is very useful to test (Command -> Read chip signature) that the wiring is correct and you can also try programming a .hex file:
* File -> Load FLASH file to buffer
* Command -> Write FLASH buffer to chip
