Creating semi-immersive environments for activity design with coordinated commodity projectors
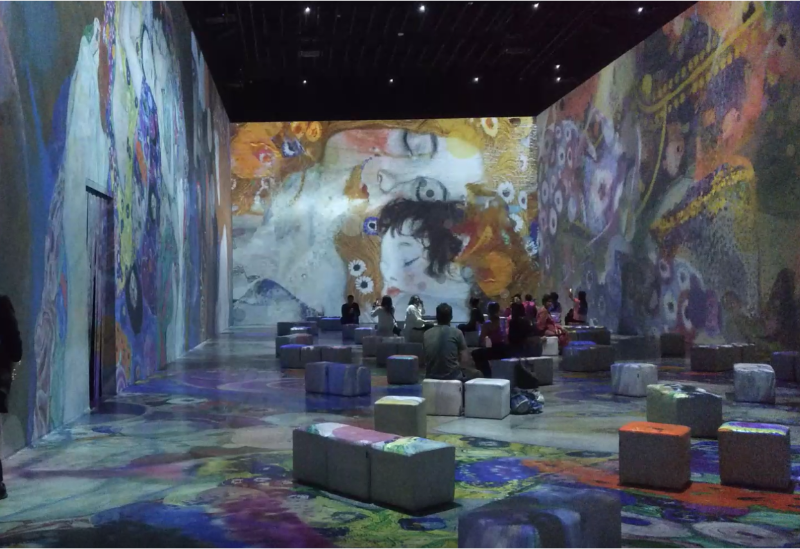
Abstract: Using immersive technologies in education can improve learning procedures by providing environments that deliver enhanced sensorial stimuli, affecting sight, hearing, and sometimes, touch. But generating a sense of immersion for groups is not easy, and available solutions often involve expensive and sophisticated hardware (powerful graphics, tracking systems, headsets, etc.). Lately, multiple projections covering a large portion of the spectators’ visual field have become plausible alternatives for providing some degree of immersion at much lower cost and complexity. We explore this approach for creating learning environments for children. An example considering life in the Stone Age is also presented.
Keywords: (Semi) Immersive visualization, digital media, digital contents creation, digital art.
The resource list: Required: one or several commodity video projectors, computers and projection screens (or white walls) for generating the video images, and a projection area where the lights can be dimmed. Also, it is recommended to count with different instruments, devices or other props related to the designed activity that can help recreating the desired environment, atmosphere, or historic age. Last, it should be noted that the projection systems do not require high resolution graphics or high performance computers.
The background and importance of the topic
The aim of this activity is to propose teachers and teacher-students (students of education degrees) a method for creating multiple projections events. This includes the generation of audio-visual materials and their distribution among sets of projectors, looking for the creation of low-cost semi-immersive settings that can present multiple information or recreate specific historical, cultural, or natural environments for didactic purposes.
The underlying goal is creating backgrounds that will provide a wealth of information and/or make children feel like as if they were submerged in specific themes or environments. This feeling will favor their participation in the didactic activities organized within that specific theme, improving their assimilation of the main aspects of the environments under consideration. Examples of plausible themes are prehistoric life, rain forests, the Middle Age, the Solar System, oceans, space exploration and many others.
The approach presented here is based on two different, independent stages. The first one is devoted to the design and development of the elements that will recreate the specific environment in which the children’s activities will take place. The second one pursues the design of the activities to be carried out with the children, according to the didactic goals sought for each activity and group of kids. Regarding the first stage, it also involves two steps:
- Creating audio-visual contents related to the global activity theme
- Designing and using combinations of different projectors covering a large area of the participants’ visual fields, mixed with different props for enhanced realism. The bottom line is to immerse kids into the selected environments, supporting the achievement of the didactic goals of the whole activity.
- Use pictures, videos, and other multimedia contents integrated in settings that recreate specific areas of the world, cultural or historic events, etc.
- Work with children carrying out didactic activities from different areas in the selected scenarios. A non-extensive list of possible activities include:
- Art: Painting, photography, theater, shadow puppets, dance, music, etc.
- Technology: Making primitive tools, recreating findings such as the discovery of fire or the wheel, food preservation, etc.
- Historical recreations
- Environmental: discovering/understanding nature (oceans, rainforests, high mountain areas), etc.
The activity description
As mentioned above, this document presents a methodology for creating activities in semi-immersive settings. The proposal suggests the fulfillment of the following steps:
1. Define the pedagogical objectives to be reached. This should be performed at two levels: At the subject or theme level, and the activity level. Additionally, other goals can be thought of and included in the activity design process.
a. At the subject or theme level: Selecting a specific theme, such as the Stone Age, the Roman Empire, universe & space exploration, the Amazonas rain forest, etc. Selecting a theme will result in the children learning specific aspects of that subject, largely independently of the kinds of activities to be carried out by them, because the theme will englobe every single activity. This knowledge will be acquired in an attractive way, using the different materials to be presented to the children.
b. At the activity or task level: Developing skills related to the tasks performed in the activities planned (for example, for audiovisual/art subjects, skill development in fields such as drawing & painting, music, theater, dance, etc.). Many others can be conceived, such as basic or fine motor control and hand-eye coordination for constructing objects with blocks or lego-like sets, learning about collecting fruit or berries, cooking, etc.
c. Additionally, the way the activities will be carried out can help starting exploring the development of competences included under the “21st century skills” tag through the performance of group activities, such as cooperation, communication, etc.
2. Design the activity. Also, this can be done in several levels:
a. Select a script: Even though this is not compulsory, taking a storytelling approach might offer opportunities for improving child involvement. For example, if we want to focus on art and embed the activities within the Stone Age, we could present a situation where the school has found a larger cave, much better for teaching and playing, and the kids are in charge of the task of decorating the new cave with paintings (such as handprints, for instance), or organizing an inaugural party with music, theater, dance, food, etc.
b. Design the specific series of didactic activities that will be carried out, centered in art, technology, food gathering and preparation, etc.
c. Plan the timing of the whole activity. Is there going to be a sequence of images or videos that the kids should watch? Should activities be carried out in a sequence? Will everybody follow the same sequence, or will there be groups of kids performing different activities? Selecting among these options has consequences on the whole process.
3. Design or select the contents to be projected. Once the theme and activity have been defined, the materials to be projected must be selected. Images, music, and videos can be downloaded from internet, but it is also possible to create and edit multimedia content using any available software, such as Adobe Creative Cloud or any other. Also, it is possible to prepare slide presentations that include sounds or videos and reproduce them in loops. Of course, the selected contents must match the pedagogical goals and designed activities
4. Design the floorplan of the projection area: If it is possible to choose the way the projectors are located within a large area, it might be interesting to define a spatial narrative that makes visitors go through a series of multimedia contents before arriving to the place where the core activities will be carried out. In a way, the idea is to create some narrative with the way and timing the information is presented to children.
5. Select props and create the environment: Depending on the theme, it might be possible to include objects and devices that belong or resemble others that are or were relevant with respect to the selected theme and script. Props are usually an effective way to increase the feeling of immersion for children. Customs or outfits prepared in class or brought from home can be included within set of props.
6. Iterate until a fully satisfactory design is reached: It is important to cycle among the steps 1 to 5, refining them until the activity is fully developed. For example, new content found might suggest introducing changes on the theme, script, activities or floorplan.
7. Assemble the whole set-up and perform the activity or activities. After the environment is designed, created and assembled, the activity or activities planned in step 2 can be carried out.
The activity solution
This section gives an example of thematic and pedagogical activity design, centered on Prehistoric times and cave dwellers: We are prehistoric. In this example, children will be submerged into prehistoric times, looking at different aspects of life during Paleolithic to Neolithic times, and perhaps, related aspects such as how Science (in particular, paleontology and paleoanthropology) have been gathering evidence to support what we presently know about humans living at those times.
For that purpose, we will consider two levels of activities:
- Thematic activities, centered in aspects related to the Stone Age, and addressed to creating the framework for the whole set of activities.
- Pedagogical activities, covering specific educative actions (such as painting, dancing, cooking, etc.), and carried out within the general thematic framework.
1. Pedagogical objectives to be reached
a. At the subject / theme level: We have selected life during the Stone Age, including from the Paleolithic to the Neolithic periods. We consider this theme as well adapted for developing a wide range of activities with first childhood education children, fitting also well in primary and secondary education. The theme interest comes not only from the fact that it is a very distinct time and environment, but also because it allows introducing the sciences and research methods and techniques that have provided what we know about those ancient times.
b. At the activity or task level: Recreating how humans lived (from hundreds of thousands of years to a couple of millions years ago) provides a very interesting environment, well adapted for performing many curricular activities, including drawing & painting, modeling with clay or play-dough, building tools, music & dancing, theatre, etc. Our suggestion is based on art: painting, clay modeling, theater and dancing.
c. Additionally, the activities to be performed can foment aspects such as cooperation and communication.
2. Designing the activity
a. Script: We are a group of cave dwellers. Our friends and relatives from beyond the mountains are coming to visit us, and we want to move into a bigger cave so that we all fit. We are charged with decorating it and preparing a welcome party with music, theater, dance, food, etc.
b. Didactic activities to be performed:
- Drawing & painting: Many prehistoric caves have handprints in different walls. Truly, getting pigment blown over the hand into the cave wall, or getting paint in the hands and placing them on the wall are some of the oldest methods for creating cave art. We can do something similar and either have kids put paint in their hands and leave prints on large cardboards, or place hands in pieces of cardboard and draw or paint the spaces left (obtaining thus a “negative” of their hands). We can then either hang up the cardboards, or alternatively, scan the individual prints, and compose images with all the handprints by using computer software for drawing and illustration. The composed pictures can then be printed and hanged up or projected into the walls. Also, children’s drawings of animals can be added to the cardboards or projected images.
- Theater: Prepare a play where kids represent actions such as collecting berries, lighting a fire, fishing, or scaring and gathering animals into farms. Scripts for the plays can emphasize the importance of collaboration for human life nowadays as well as during the Stone Age.
3. Design or select the contents to be projected. Internet has many contents related to caves, cave art, cave dwellers, speleology, paleontology, paleoanthropology, etc. The materials chosen for being projected have to depend necessarily of the planned activities and the children age. As an example, we can look for and select contents from the following subjects:
a. The world of caves. Types of caves, caves located nearby our town or relevant by some reason, etc. Cave exploration.
b. Cave art. Discovery of the first cave paintings in Altamira, and reactions to the discovery. Handprints in caves. Schematic and stylized paintings. Full color animal paintings. World distribution of cave art.
c. Climate changes during the Stone Age. Glaciations.
d. Fauna during the Stone Age.
e. Life of cave dwellers. Tools and weapons.
Each of these subjects can be assigned to a projector or set of projectors, or they can all be combined and displayed in just one or two projectors. The available space for developing the activity, together with the number of available projectors, will define the way the audio-visual contents is presented. Work in this section has to be done in close relationship to the way the floorplan is designed in the following step.
4. Design the floorplan of the projection area: Depending on the available space, projectors and contents, we can think about how the projectors and materials will be distributed within the projection area. If children and visitors have to follow some path to get to the central area where the main activities will be carried out, it is possible to create a narrative with the way the materials are displayed. For example, section three (Design or select the contents to be projected) has a listing of subjects that can be presented in a sequential way, either separated in time or space.
5. Select props and create the environment: We can include simple props, such as creating a simulated cave using camouflage fabric, lamps simulating fire, firewood, etc. Additionally, we can include dresses or outfits prepared in class or brought from the children’s home.
6. Iterate until a fully satisfactory design is reached: Depending on the available settings, it is important to cycle among the steps 1 to 5, in order to make sure that the activities can be carried out and are meaningful for the kids.
Enhancing the Activity
There are many different options for enhancing this activity. For example, we can talk about prehistoric professions: We can explain which were the essential activities at prehistoric times: Making stone, wood and bone tools, weapons, and instruments; lighting and taking care of fires; making garments and moccasins; pottery; agriculture and farming, etc. We can also talk about the first “industrial” discoveries, including the wheel and the loom.
Time periods and some suggestions regarding activities performed at that time (some of these suggestions are for older students):
- Paleolithic: hunters – gatherers (immersive projections with videos + pictures; Internet can provide a wealth of material free for using in education environments).
- The Neolithic revolution (Immersive projections with videos + pictures; same as before regarding Internet).
- Toolmaking: preparing a tool with a sharp edge using stones.
- Fossil workshop: creating our own “fossils”. Printing footsteps or handprints in clay.
- Fires: how to light and take care of fires with the resources available at that time.
- Pottery workshop.
- Theater: Dressing-up and performing a play (distributed in groups).
- Gatherer’s snack: collecting (or buying) and preparing a snack with fruits and berries. Learning how to distinguish among different berries and other edible food from forests.
- How Science (in particular, paleontology and paleoanthropology) have been gathering evidence to support what we presently know about humans living at those times.
The knowledge test
Where did prehistoric people live?
What kind of materials did prehistoric people used for making tools and weapons?
What kind of paintings did prehistoric people do?
Some examples of discussion topics:
Why do you think prehistoric people lived in caves?
Was the weather just like it is now all the time at prehistoric times?
For special needs’ learners
The specific features of projection-based activities make them well suited for developing learning environments for children with special needs, since they are based on capturing the children attention through audio-visual, semi-immersive media. Activity design for them has to take into consideration necessarily aspects such as age, educational level and specific features and didactic goals for them. But the method’s flexibility allows adapting it to a wide variety of audiences and didactic needs.
Conducting a Workshop
This learning activity is devoted to familiarizing teachers (pre-, in-service, or students from teaching degrees) with the possibilities offered by digital media, including tools for creating audio-visual contents, and setting up exhibition areas by combining series of low-cost projectors, computers and sound systems (even old, outdated projectors and computers are useful for this purpose).
In general, attendants to workshops in Activity 4 from IO2 will be familiar with common software for drawing, painting and preparing slide presentations. Also, they will be familiar with setting up projection systems composed of computers and projectors. In consequence, they will have the basic knowledge needed for carrying out this activity.
Nevertheless, there are specific tools that offer a wealth of possibilities for creating digital contents and digital art that are not so well known. Also, the design procedure of this kind of activities requires taking a number of issues into consideration. In consequence, a workshop for this activity should cover both methodological aspects (including the design procedure), together with basic activities for content creation, such as retouching pictures or adding text, sound or simple special effects to pictures of videos, or creating videos by editing and postprocessing sequences captured with digital cameras, tablets or mobile phones.
Workshop
Workshops for Activity 4 from IO2 can be organized as follows:
First, a short brainstorming session will be conducted for proposing different themes that will constitute the framework of the activity to be developed. People attending the workshop will form groups then, according to their interests and the subjects that fit better with their needs and likings (actually, this session could take place before the real workshop, in a specific on-line session devoted to this subject). Alternatively, participants can also form groups and select theme and script from a collection of previously designed subjects that will be available for the workshop attendants.
Depending on how the workshop is designed, and the available time, short seminars will be offered regarding simple tools for image and video editing. Afterwards, each group will carry out the design activities listed in the Activity Description section. Digital contents will be gathered, organized, and assembled in presentations. They will be uploaded then in the available projection systems, and the environment will be ready. Last, each group will design a range of educational activities to be developed taking advantage of the created environment.
After all groups have finished their work, each group will present their design. Also, there will be time for each group to carry out one of the designed activities, which will be performed by another group. This way, every group will design an activity which will be carried out by another group, and each group will carry out an activity designed by another group.
Finally, the workshop will end with a wrapping-up session, where participants will discuss issues regarding all the activities carried out in the workshop.
References
1. [Collado 21] Collado Giraldo, Hipólito & García Arranz, José & Bea, Manuel & Ramos Muñoz, José & Cantalejo, Pedro & Domínguez-Bella, Salvador & Fernández-Sánchez, Diego. (2021). HANDPAS: Manos del pasado. Catálogo de representaciones de manos en el arte rupestre paleolítico de la península ibérica. Publisher: European Union/Junta de Extremadura