Draw a Cube
Description
This applet goes through the steps to draw a cube. The idea is to use different projections and step through drawing the cube. This should help you see three-dimensional shapes from the different projections. Use the navigation buttons to step through the construction.
Step 1: Draw a square in the x-y plane.
Step 2: Draw a connected square in the x-z plane.
Step 3: Draw a connected square in the y-z plane.
Step 4: Draw the cube side parallel to the y-z plane on the opposite side.
Step 5: Draw the 'top' square parallel to the x-z plane.
Step 6: Draw the 'front' square parallel to the y-z plane.
Change the view and restart the construction.
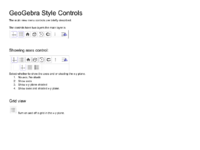
Try the style controls in the top right of the frame. Style Tools described in the below document.
Look at different projections. The order of the projection tool buttons are : Isometric (+ axes are 120 degrees apart); Perspective (lines further away get shorter); 3D glasses (need color glasses to give each eye a different view); and Oblique (A reference 2D plane with closer out of plane being down and to the left ).
The Home view menu tool buttons are : Default view; Fit view to objects; View from +x,+y,+z center (good for isometric view); Top view (from +y axis); Front View ( from +z axis); Side View (from +x axis).
There is a rotate animation button that rotates the view about the y axis.
The goal here is to get familiar with drawings of three dimensional objects.
Note that lines behind a cube face are dashed.