Center of Attention
Extend
We all know the Pythagorean Theorem: . But what does this have to do with circles?
In the GeoGebra applet below, click and drag point P. Be sure the "Show Trace" box has a check mark. Notice the trace that point P creates.
GeoGebra Applet 1
What shape did the trace of point P create?
If we call the base of our triangle and the height of the triangle , then we can write the Pythagorean Theorem as . Based on what we saw in the GeoGebra applet above, we noticed that the hypotenuse of this triangle is also the radius of the circle. So we can now rewrite our equation as
This is the equation of a circle with a radius and a center at .
Looking at the GeoGebra applet below, we see that is no longer on the x-axis. How will this be different from what we saw above? Just like before, click and drag point P. Be sure that the "Show Trace" box has a check mark. Notice the trace that point P creates.
GeoGebra Applet 2
Summary
In the examples above, we saw that point A was the center of the circle, and we kept the hypotenuse of the triangle constant. This constant distance between point A and point P becomes the radius of a circle when we allow point P to move while maintaining its distance from point A.
Let's call the center of our circle (point A). From there, we can label the length of the base () of our triangle and the height () of the triangle . Now, we can write the
Pythagorean Theorem as : .
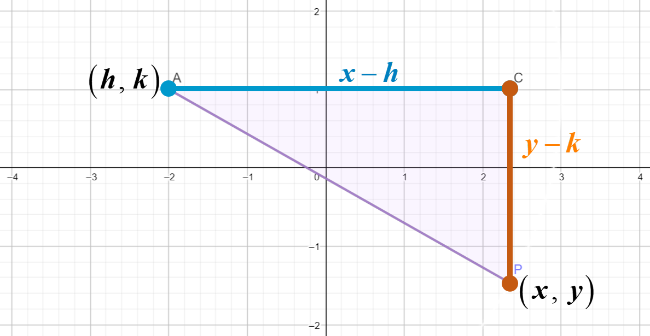
Based on what we saw in the GeoGebra applet above, we noticed that the hypotenuse of this triangle is the radius of the circle. So we can now rewrite our equation as
This is the equation of any circle with a radius and a center at .